XC CopyBOT Setup
Download the latest version of the CopyBOT The latest version of thr BOT can always be found on our Github, or in our Discord This Github link will take you to the latest release automatically: https://github.com/XCReleases/XC-PASSIFY/releases/latest
Once downloaded, extract the folder from the .zip file
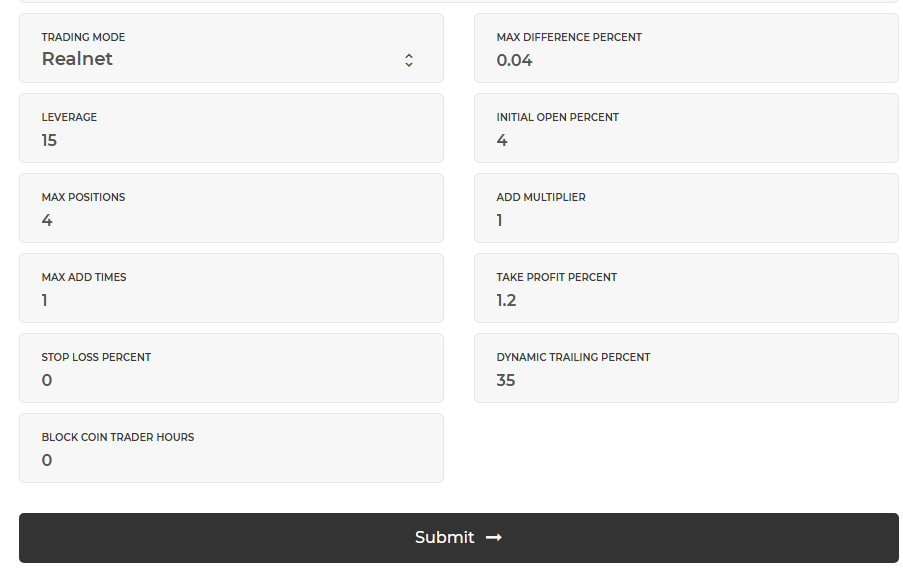
Run the .exe file in the folder and you will be met with the wizard setup Here's a run-through of the different config settings:
Leave this as it is. It just tells the BOT to trade on Bybit
Here you will need to paste the "short" API key we saved earlier when creating the key
Paste the "long" API key we saved earlier
If you created your API on testnet, leave this as "yes". If you are trading on the mainnet, change this to "no"
The UID is the indentifer of the trader you are copying. You can find this at the end of the Binance URL when you are on their profile. See the example URL below https://www.binance.com/en/futures-activity/leaderboard/user?encryptedUid=F34D356A6257FBE82874AB89411E09D7
Since we are copying traders on Binance, but trading on Bybit there may we some slight prices differences for coins. This setting allows you to set the max difference. If the trade is not within this then it will not open
If you don't know what this option is then you probably shouldn't be using the BOT...
This is an important one. This is the starting position size that will be opened for each trader. The default is 0.5%. So, if you had $1000 in your account then each trade would open at $5. The higher the %, the more risk
This is the max amount of positions that can be open on your account at any one time
This is the multiplier that will be added to your trades current position margign if the trader adds to their position size. If your position is $30 in size and the trader adds, since we're using a 1x multiplier it will add another $30. So your new position size would be $60. If they added again, it would increase your pos size to $120 and so on
This limits the amount of times your position can be added to
This is your UNLEVERAGED take profit. To get the real TP %, do your leverage * takeProfitPercent. Set to 0 if you wish to follow the traders exits
This is your UNLEVERAGED stop loss. To get the real SL %, do your leverage * stopLossPercent. Set to 0 if you wish to follow the traders exits
Dynamic trailing can be seen as a "moving SL". It requires you to use a take profit %. Once your position hits your TP %, your dynamic trailing will be activated. If your TP was set to activate at 20% and your dynamic trailing was set at 15%, your SL would be moved 15% behind your 20% TP that was triggered. So instead of your TP just taking profit as soon as it's triggered, you are willing to risk 15% of that profit to hopefully gain more profit. Since 15% of 20 is 18, in this example your SL would be set at 18% when your position hits 20% profit. Set to 0 if do not want to use dynamic trailing Example config using dynamic trailing:
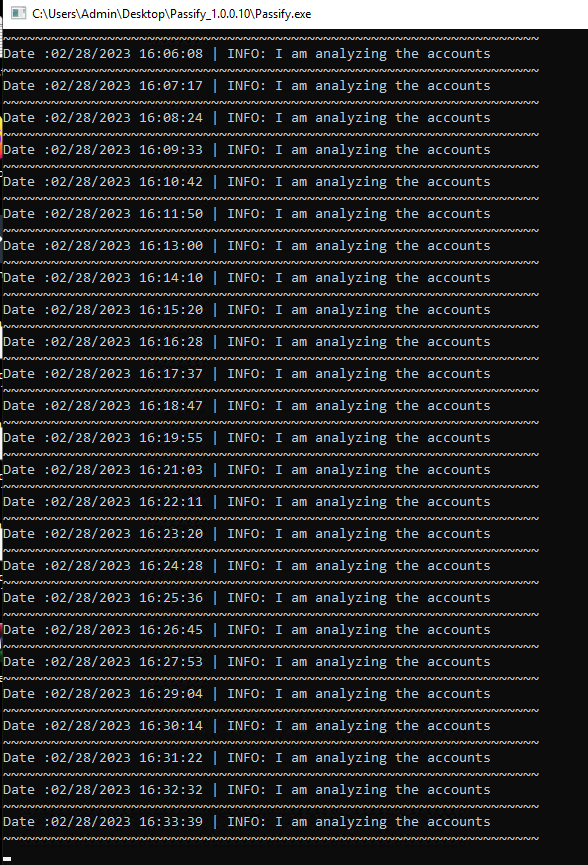
If all is running correctly, you should see logs similar to the below. This means the BOT is watching the account for trades
Last updated